Python利用itchat对微信中好友数据实现简单分析的方法
Python 热度一直很高,我感觉这就是得益于拥有大量的包资源,极大的方便了开发人员的需求。下面这篇文章主要给大家介绍了关于Python利用itchat实现对微信中好友数据进行简单分析的相关资料,文中通过示例代码介绍的非常详细,需要的朋友可以参考下。
前言
最近在一个微信公众号上看到一个调用微信 API 可以对微信好友进行简单数据分析的一个包 itchat 感觉挺好用的,就简单尝试了一下。
库文档说明链接在这: itchat
安装
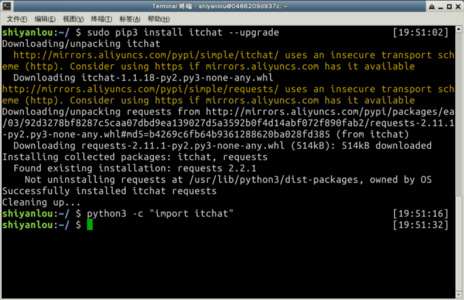
在终端中输入以下命令,完成微信的API包itchat的安装。
我们这里使用python3的环境(python2也是可行的):
sudo pip3 install itchat --upgrade
通过该命令判断是否安装成功:
python3 -c "import itchat"
如果没有报错信息说明你已经将实验环境安装完成。
微信好友数据进行分析示例
首先统计一下微信好友的男女比例:
#coding:utf-8
importitchat
# 先登录
itchat.login()
# 获取好友列表
friends=itchat.get_friends(update=True)[0:]
# 初始化计数器,有男有女,当然,有些人是不填的
male=female=other=0
# 遍历这个列表,列表里第一位是自己,所以从"自己"之后开始计算# 1表示男性,2女性
foriinfriends[1:]:
sex=i["Sex"]
ifsex==1:
male+=1
elifsex==2:
female+=1
else:
other+=1
# 总数算上,好计算比例啊~
total=len(friends[1:])
# 好了,打印结果
print(u"男性好友:%.2f%%"%(float(male)/total*100))
print(u"女性好友:%.2f%%"%(float(female)/total*100))
print(u"其他:%.2f%%"%(float(other)/total*100))
from
echartsimportEchart, Legend, Pie
chart=Echart(u'%s的微信好友性别比例'%(friends[0]['NickName']),'from WeChat')
chart.use(Pie('WeChat',[{'value': male,'name': u'男性 %.2f%%'%(float(male)/total*100)},{'value': female,'name': u'女性 %.2f%%'%(float(female)/total*100)},{'value': other,'name': u'其他 %.2f%%'%(float(other)/total*100)}],radius=["50%","70%"]))
chart.use(Legend(["male","female","other"]))
delchart.json["xAxis"]
delchart.json["yAxis"]
chart.plot()
chart.save("/Library","phones")
效果如图:(不知道为什么还有那么多 其他。。。)

然后抓取所有好友的个性签名,看看其中的高频词汇:
# coding:utf-8
importitchat
importre
itchat.login()
friends=itchat.get_friends(update=True)[0:]
tList=[]
foriinfriends:
signature=i["Signature"].replace(" ", "").replace("span", "").replace("class", "").replace("emoji", "")
rep=re.compile("1f\d.+")
signature=rep.sub("", signature)
tList.append(signature)
# 拼接字符串
text="".join(tList)
# jieba分词
importjieba
wordlist_jieba=jieba.cut(text, cut_all=True)
wl_space_split=" ".join(wordlist_jieba)
# wordcloud词云
fromwordcloudimportWordCloud, ImageColorGenerator
importos
importPIL.Image as Image
d=os.path.dirname(__file__)
alice_coloring=np.array(Image.open(os.path.join(d,"wechat.jpg")))
my_wordcloud=WordCloud(background_color="white", max_words=2000,mask=alice_coloring,max_font_size=40, random_state=42,font_path='/Users/sebastian/Library/Fonts/Arial Unicode.ttf').generate(wl_space_split)
image_colors=ImageColorGenerator(alice_coloring)
plt.imshow(my_wordcloud.recolor(color_func=image_colors))
plt.imshow(my_wordcloud)
plt.axis("off")
plt.show()
# 保存图片 并发送到手机
my_wordcloud.to_file(os.path.join(d,"wechat_cloud.png"))
itchat.send_image("wechat_cloud.png",'filehelper')
效果如图:

总结
以上就是这篇文章的全部内容了,希望本文的内容对大家的学习或者工作具有一定的参考学习价值


